Back in the summer of 2023, my wife bought a Lexus, then I sold the Ram and another F150 replaced it.


Grassroots level racer chasing his dream
Back in the summer of 2023, my wife bought a Lexus, then I sold the Ram and another F150 replaced it.
I’ve made several changes to the car over the fall/winter so I’ll just make one big post to catch up. These aren’t necessarily in chronological order.
I’ve had issues with brake bias since day one. The plan was to install a Wilwood bias adjuster and tailor it to my needs. Before I committed to this, the decision was made to remove the 13” rear rotor setup and step down to a stock sized rotor.

I really liked the way the Baer setup looked but the abysmal braking characteristics had to go.


My efforts paid off and the car now stops with authority! Knowing that my front pads weren’t the greatest, I got with Nick @ www.RoadRace1.com and he got me squared away with some Hawk HP+ pads. They’re best suited for Autocross cars and I’ll be installing them soon.
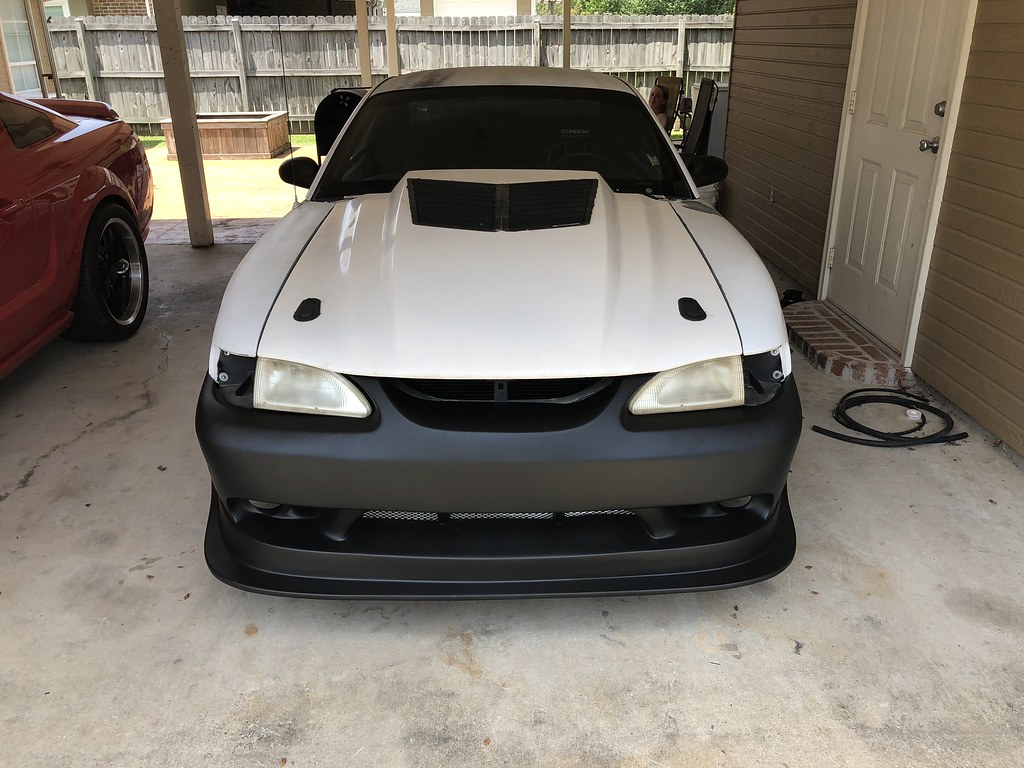
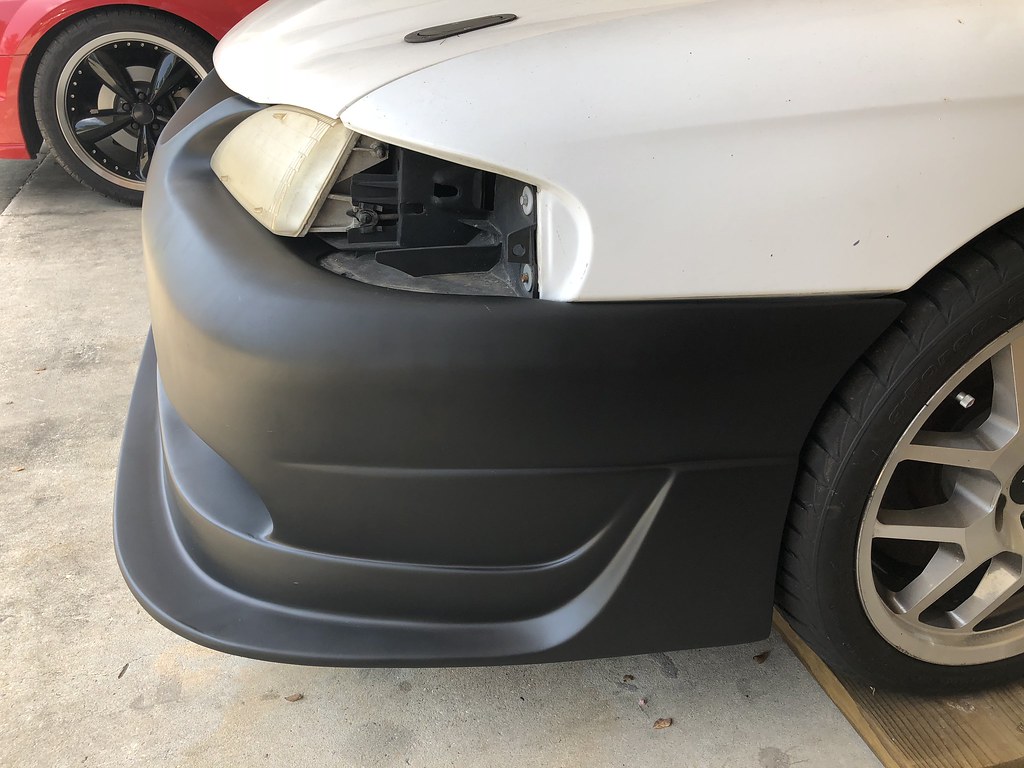
This has been a long time in the making. Finally made the jump and switched to 315/30r18 BFGoodrich Rival 1.5 tires and 18×11 Enkei RS05RR wheels. In order to do so, I had to run a slim (5mm) spacer in the front to clear the coil over spring. Also, I was forced to put the old, busted up Saleen bumper cover on to clear the big rollers. The car is surefooted and the grip in phenomenal.

My car has always had a great exhaust note. My setup has a 3” x-pipe but the rear section was 2.5”. The decision was made to finish it out in 3” and I switched to a set of dumped Magnapack mufflers. Now she screams!


Air conditioning!

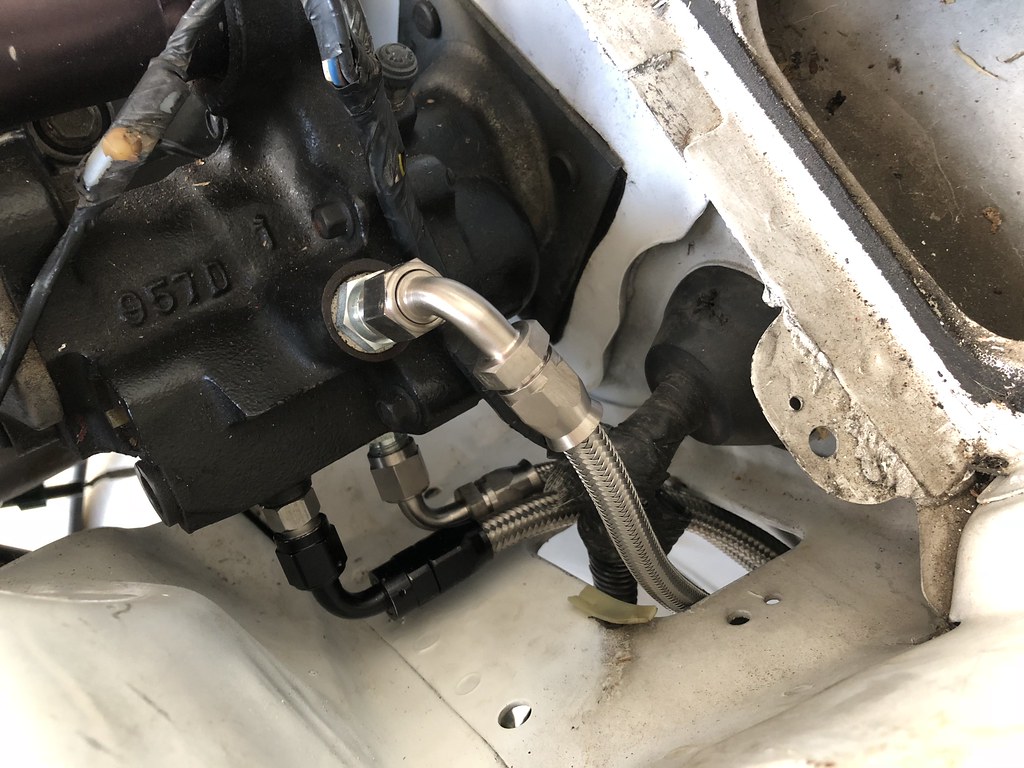
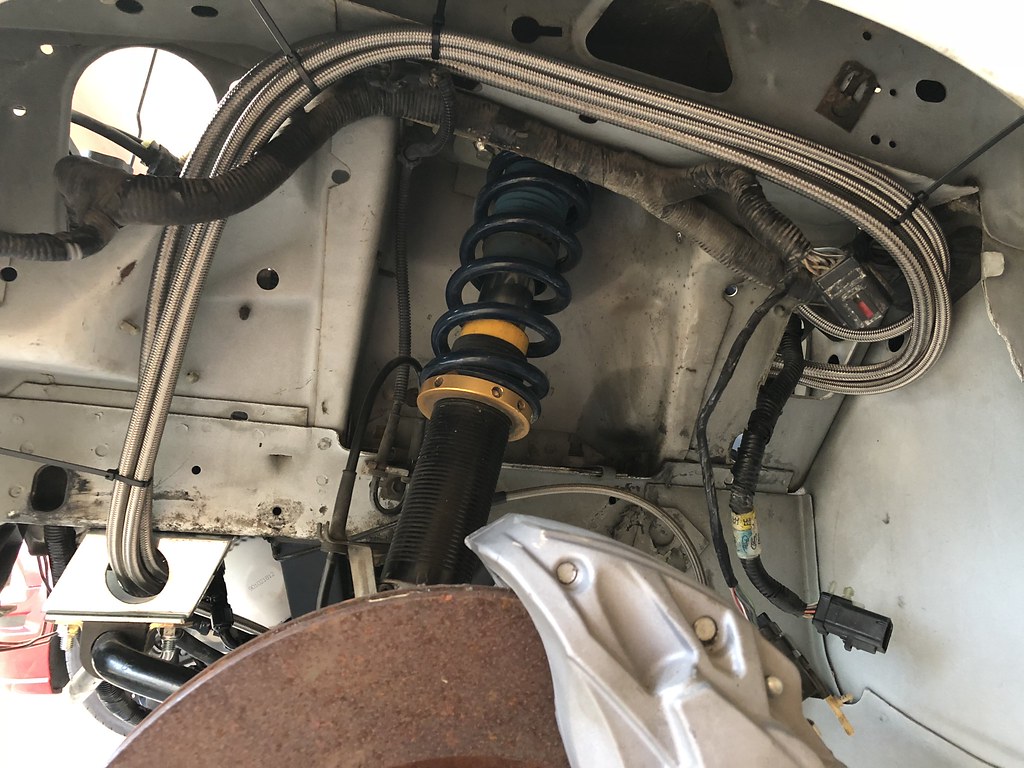
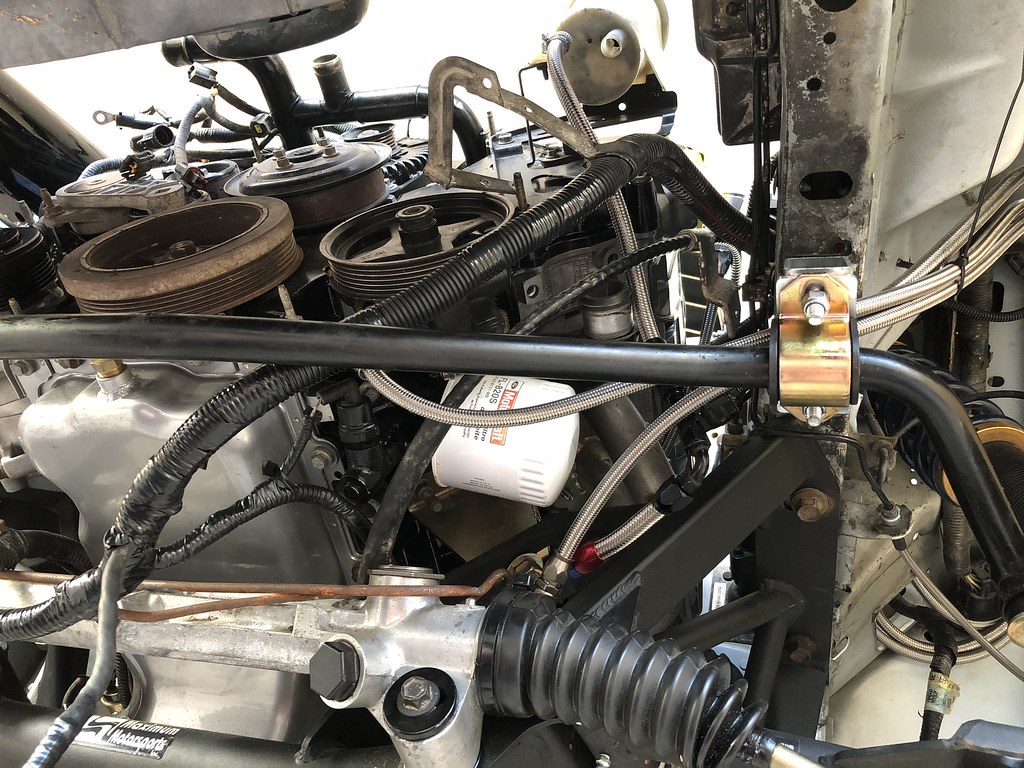
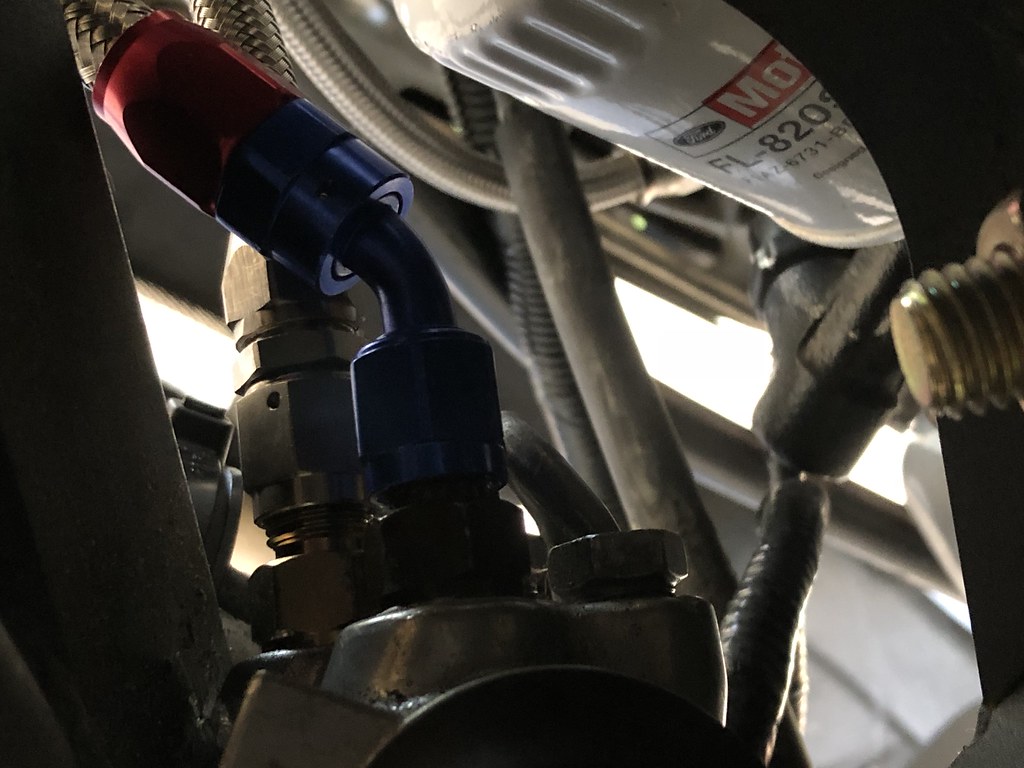
New high pressure (pump to hydroboost) line


New front tires


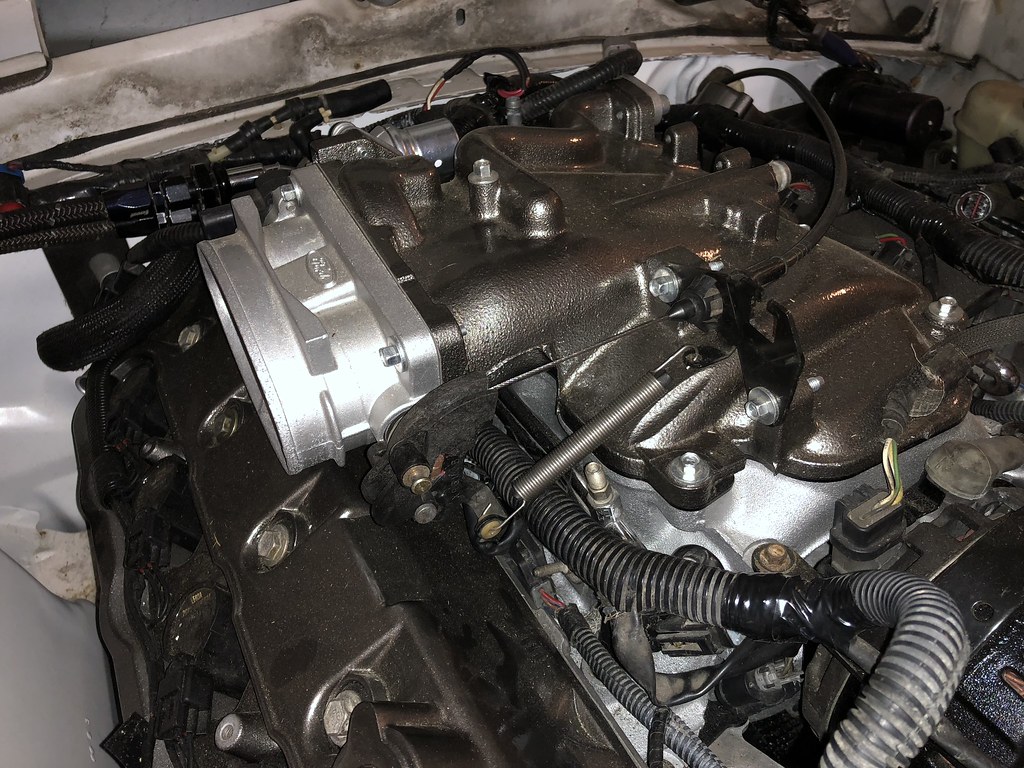
Since last summer, I have made several meaningful changes and quality of life improvements to the car. One of them was a Motion Raceworks catch can. Previously, I had a pair of open element filters on the cam covers. This would leave an oil sheen on the cam covers and you could smell the vapors.


I’ve been holding onto this for a while. Found the time to install it and here are some pictures:


For those following along, you’ll know my wife has been driving my Ram while I shake the bugs out of her car following a cam swap. When her car is down, I’ve been driving my car daily. I’m currently working 7 days a week and it has been challenging with no air conditioner in the south Louisiana brutality, I mean summer. At first, I was carpooling with a co-worker to save fuel costs but he’s out of commission due to an injury.


Yeah.. I’ve decided to restore the AC to functional status because this is miserable.
At least she’s nice to look at.


Decided to cam swap my wife’s 2005 GT and the deal was for her to drive my truck while I worked the bugs out. Jesus H Christ, did I have no idea how many kinks I was facing!!! I’ve had to sort through this list since April 25th:


Much more to come!

This came together nicely!! Just need to order the grilles for the GT vents, install the Race Louver vents and my Aerocatch latches for it to be complete.


Decided I didn’t want to wait to install the remaining parts and swapped hoods. It looks amazing.


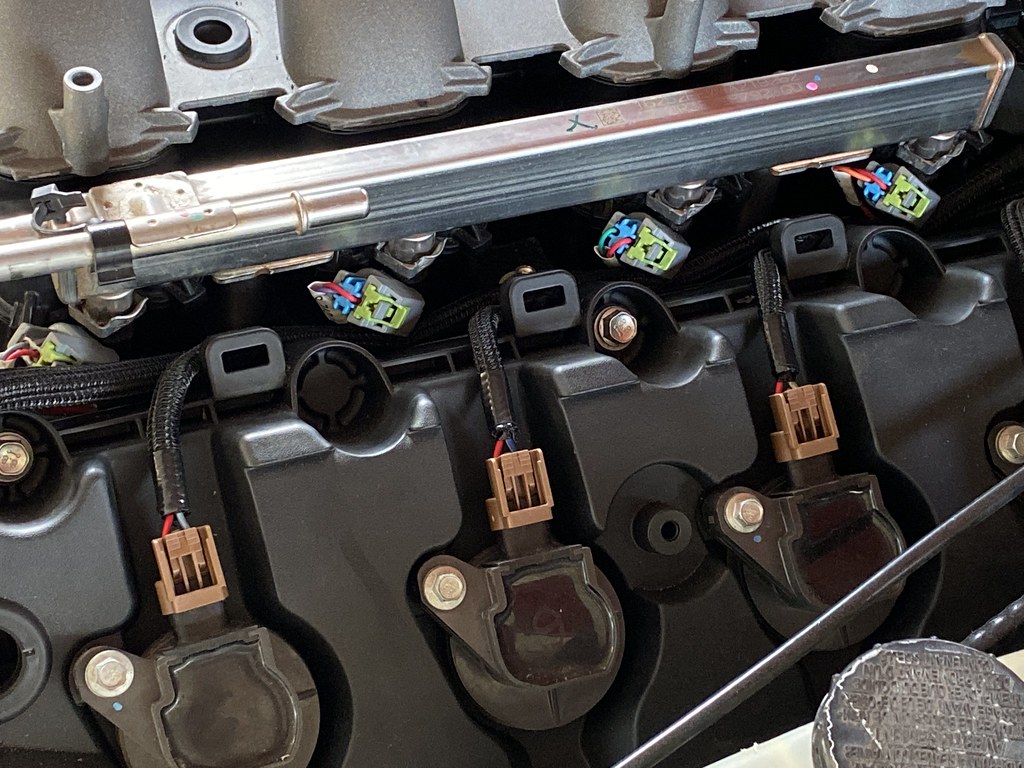
Drove the car to work yesterday and the fan was still working fine. When I got home, fired the car up to do some data logging and the fan then abruptly stopped.
Great. Set the PWN to 20% @ 0 RPM and started to troubleshoot the issue. When I wiggled the fan connector it started to run. Pulled it off and found this:


Dammit!! Looked around and found the original fan from my cars pushrod days and put it back in. It fits the 5.0 style radiator so much better than the 4.6 fan did, imagine that. I’m going to replace the fan connector as soon as it arrives in the mail. The entire setup will be revamped with either the Delta PAG setup or something comparable that’s readily available.

Progress picture for the heat extractor hood!

Brought the car to a local alignment spot a friend recommended and I’m happy with the results.


The cylinder head temps were steadily climbing and I suspect this MAXI fuse folder is cooked. Replaced it with a 40A circuit breaker


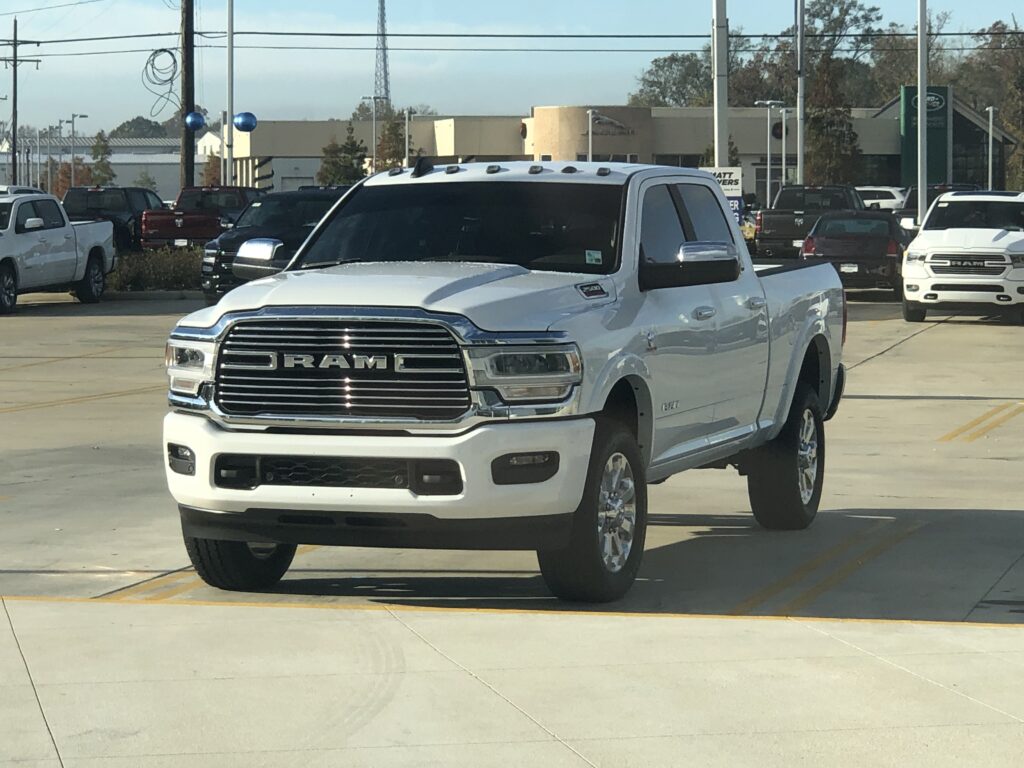
Met my wife for lunch and couldn’t resist taking a picture of both my vehicles together in the wild.


This isn’t normal!!

This video will tell the entire story!!
Picked up a stock replacement rack from O’Reilly Auto Parts and got down to business.


Still need to bleed that air from the system but this task is largely complete.


Drove it to work with no headlights for a much needed boost in morale.


The next before the event, a Friday, I woke up to a flat tire. While having it repaired, I made a new buddy.

After I got the car home, I loaded it up and began packing for the weekends event.


A few buddies noticed I had my straps crossed and advised me not to.

It was a nice hour and a half drive. The truck handled the situation flawlessly and I felt really good about the day. The weather was going to be shitty for the early day hours but was going to clear up around lunchtime. It was going to be a great day.

Arrived late but just in time for the morning driver’s meeting. We split into run groups and i unloaded the car for tech inspection. Forged pistons tapping away, I drove it to the covered pit area where she passed tech. Drove it from there to the control tower for a classroom session. This would be the last time I drove the car before it kissed the wall.

After lengthy rain/lightning delays, we went out for a parade lap/no helmet session. They gave us the option to allow the instructor to drive 2 laps or so to show you the line in your car.
On the third lap, exiting turn 16 into the straight, the car got a little loose on throttle, so he hit the clutch and slammed on the brakes. The rears locked and I don’t need to tell you the rest. Hit the inside wall on the straight at an agonizingly slow speed. Finally got the ****** back on track and drove another lap and then pitted to inspect damages.

Between work demanding my time and the fact I have been disgusted with the car lately, I haven’t kept up with updating this thread. I’ll fix that right now.
After finally getting the appropriate fitting, I reconnected the lines and gave it another try. This time it didn’t leak but that was the end of the good news.


Those with sharp eyes can spot the issue right away but I’ll get back to this later.

The first drive went well enough until I realized I was laying a smoke screen. As it turned out, the new dipstick tube wasn’t fully seated and I was spewing oil directly onto the header. Yay 100+ pounds of oil pressure!!

Couldn’t resist a picture! After getting back on the road I noticed the steering was HARD and it would only move with throttle input. Great… That means air trapped in the lines.

More gratuitous glamour pictures…


Who doesn’t like carbon fiber??


Kept noticing small amount of PS fluid on the ground and it took me a bit to find the source. The upper hose was in a bind and it severed the PTFE at the edge of the ferrule. As it leaked, it traveled through the steel braided shield and transferred to another hose before dripping to the ground. Chased that for a few days and then it took me a few tries to get it right but I repaired the leak.

Tried to bleed the air from the system on a few occasions but to no avail. The normal turn the wheels lock to lock method didn’t help. Decided to pull the system under a vacuum but had issues getting the ‘plug’ to seal in the reservoir.
Chassis is stiff!!

Another trip around the block proved that round of bleeding to be unsuccessful.

Made a bleeding port by drilling/tapping the reservoir cap to accept a 1/4 tubing fitting and using a Mityvac to pull it under a vacuum.


Took the car for a spin and it felt good but it got a little touchy at low rpm’s pulling into the carport. I’ll nail it down but she’s good enough to play around.
What a week.. Took off yesterday to finalize a few things on the car prior to a third party tech inspection. Finally added the line to the coolant over flow tank, washed the car and set out to the inspector. Noticed a little water in the floor board but passed it off as wet shoes.


The car passed inspection without any concerns!! Before I headed home, I decided to wipe the water up and quickly realized it was a petroleum based fluid. Power steering fluid.
Fuck.

Didn’t notice anything obvious so I headed home. Half way home, I noticed a few drops on my shoe and I truly became concerned. This is just my luck.


It’s leaking from the seal on the other side of this boot where the piston rod attached to the booster unit.

Demoralized but undeterred, I’ve scoured the internet for a replacement. Several calls to Mustang recyclers later, I found little hope.
However… I found on locally at Advance Auto Parts and will scoop that up after picking my buddies trailer up after work.


It wasn’t the right part and I was pretty bummed out. It was for a damn power stroke truck. Dejected, I drove home and drank a few beers. Found yet another booster at Vatozone and I will pick it up midday today.

The next day yielded better results, as I located the proper part. Brought it home and got right to work.


Now the stupid leaks from the high pressure fitting LOL
The damn fitting has been WRONG the entire time apparently but didn’t leak before.


At this point, the car had to sit while I tackled some work responsibilities that kept me busy for a few weeks.


New vinyl windshield strip installed

After exposing its weakness, I’ve decided to pull the electric power steering pump setup out. I’m going to replace it with an aftermarket hydraulic pump from KRC. The Volvo EPS setup, in its current form without CANBUS control, is just fine for street duty and light open track work. Finally put it to a torture test on a tight Autocross course and there isn’t enough line pressure to keep up with simultaneous hard braking AND back & forth steering conditions.


The Installation saga begins…
Started the KRC PS pump install. Had to remove the radiator fan, RH tensioner and belt. I’m going to have to run a stretch fit belt for the AC but I’m seriously considering just yanking it.


The kit was very straightforward to install.


Finished the KRC installation and hit the road for a test drive. My initial impression was how much smoother and linear the steering response is now. Now, making rapid left and right maneuvers along with braking while turning are now a non-issue. I need to bleed the hydroboost for it to be perfect but I’m am very hopeful.


First event of 2022 season today and it was a bit of a challenge. Ambient temperature was 20° F when I left home. By the time the first car went out, it was around 36° F and traction was obviously an issue for the RWD guys. It was a surely a limiting factor for me as I have no TCS or ABS and cheap 200tw tires.
Nonetheless, I tried to be more aggressive but that just exposed a new issue. The electric power steering, in its current state, has proven to be a severe handicap. The pump has nothing that speeds it up when it requires more line pressure such as simultaneous hard braking and steering. What happens is basically a sudden “dead spot” in the steering that feels exactly like when the car stalls and the steering gets super hard to turn. It works great on the street, not a huge issue on the open track or even the larger, fast Autocross layouts but it’s no good for smaller course layouts. It has to go.
Soo.. Back to the drawing board. Anyway, here are a few videos from the day. The sunlight washed it out somewhat but you can plainly see the steering issues.
Here are some candid pictures from the day:


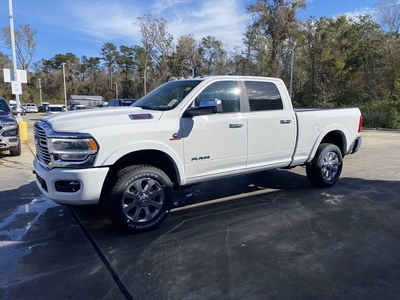
It was time to trade the 2015 F150 because the mileage was getting high and it was time to upgrade. After an exhaustive search for the right truck, I settled on this 2022 Ram 2500 Laramie. This particular truck is four wheel drive and is powered by the venerable 6.7 Cummins diesel. It is very nicely appointed and a lot more comfortable to drive than expected. We will be posting updates and we personalize this truck.


Ok, that was an inappropriate number of S words in a row but the problem is resolved. It turned out that the cabin section of the shaft was “extended out too far” while the main part of the shaft wasn’t pull into to cabin far enough.
We took the car back to the cones but this time it was a night event! My instructor buddy Brent Bravata co-drove it for the event and took first place in CAM-T!! He couldn’t stop raving about the car, which felt good. This thing is a rocket! He initially had issues with brake hop in the rear, which was mostly him not being used to the non-abs brake system, but he figured it out. This time out I was more aggressive but still need to work on exit speed between elements and that will come with time. However, his unbiased opinion helped expose some weaknesses in the brakes and we found the steering shaft contacts the header. We messed with tire pressure and found that 31/29 (hot) seemed to work the best.
My buddy William, who is also the man who built my engine, made the journey from Mississippi to see the car in action. He made some idle AFR adjustments for me while I was doing a course walk and the car seemed much happier after. Thanks, Sarge!


Brent’s first run of the night and I left the commentary. [NSFW]
My first run of the evening. Second time riding with an instructor but the first with someone else who has driven the car. This proved to be invaluable.
Brent tossing my buddy Lance around on this run was pretty funny! [NSFW]
Exterior footage of the previous run.
My fastest pass of the event. [NSFW]
Exterior footage of the previous run
This would’ve been my fastest pass but I punted a cone.
I’m not entirely sure which pass this was but here it is.
Brent’s fastest pass of the evening.
We signed up for the SCCA Track Night in America event to put the Unicorn through the paces in an open track setting. If she dies, she dies. We started the day off by washing the car, setting the cold tire pressure and packing for the day’s activities. Gave the engine bay a visual inspection and set out on the road.


The drive to NOLA went well and took about 90 minutes or so. We signed in at the main gate and found a suitable paddock location. Next time, we will get there early and claim a spot under the covered area.


After tech inspection and a novice driver’s meeting it was time to take a few parade laps behind the novice group coach to see the line. “The telephone game” is what he called it but, unfortunately, I was towards the back and the message was lost.
After the other two groups ran it was time for the first session. I readied myself, a few cameras and the car then set out for the grid… Until I remembered to check the lug nuts at the LAST second. Purposely didn’t edit that out because it was a funny oversight and i wanted to share.
Whoops…
After the first session we had a debriefing with the group coach. After that, based on what the tire chalk told me, I made a tire pressure adjustment in the rear to see how the car responded.
After running an event with painters tape for identification, I decided to look for new number magnets. Looked at a few different vendors and settled on using “Autocross Digits”. The pricing was fair and I placed my order. They arrived today and they look great. The workmanship is good and material seems to be top quality.

These are going to work out perfectly!

They’re so nice that I decided to order a new set of class magnets to match. I will put a link to their website in our vendor section.
We had a blast on the first outing with the Unicorn. The made me a corner captain, which was pretty cool. Made a bunch of new friends and was overwhelmed with advice. Even had to dodge a Miata that got lost. [#Corner4neverforget]


I have learned a bit about the car and a bunch about myself. My plan is to make no adjustments to the car and to continue improving the driver.
Can’t wait for the next event!!
See you there??
Between a busy 2020 hurricane season, Covid, a relentless work schedule and very severe hurricane Ida in 2021, things have been progressing slow for the HANO Motorsports fleet. However, this didn’t mean progress was halted and I’m proud to introduce the new face of Project Unicorn!! We commissioned a local friend to paint the car and I will let the results speak for themselves!


After finishing the rear suspension up, the race was on to get the car ready to drive. Things progress nicely in the mechanical department but the engine tuning wasn’t going so well. This prompted me to reconsider my path and revisit the Coyote swap idea. Why spend time troubleshooting something I planned to sell anyway? A deal was made with another enthusiast and the 4.6 4V chapter came to a close.
There were many steps taken to get here and I will fill in those blanks when I have the time.


I had a few tasks to complete in order to consider the rear suspension and drivetrain road worthy.


More to come!!


Always looking for more so I picked up this low mile 2017 F150 engine!! It will sport Gen 2 Mustang cams, AFS ported 2018 GT intake, 80mm throttle body and a plethora of reliability upgrades. I’m going to make the change to an electric power steering pump at the same time. Behind it will be a T56 Magnum with an Exedy twin plate clutch and finished off with a QuickTime bellhousing.
I am beyond excited.


Started to install some of the parts I got from buddy and the car is starting to look like a real car.
Sort of.


After some time passed, we got down to business. Over the course of three days, we installed the following Maximum Motorsports parts:
At the same time we installed lower torque box reinforcements and a built rear end which was freshly coated with POR15.


This car is going to kick some serious ass one day!!
The car went for a leisurely trip to the day spa but will return with the rest of the MM suspension welded up and the built rear end swapped in.
Got my Momo Corse steering wheel back from Chris Scow @ www.leatherwheels.com and he did a superb job. If anyone needs a steering wheel recovered I’d give him a shout!!
Scored a bunch of spare stuff from a buddy who was going to toss it out.
1: Cobra bumper w/ header panel
2: Side skirts
3: Trunk lid
4: decent tail lights
5: Uber dark, ninja tail lights
6: decent drivers mirror
7: passenger side side skirt extension
8: rear quarter trim
9: Inner fender trim
10: A-pillar trim
11: sail panel trim
12: Momo Corse steering wheel, 90’s style baby
Going to have this bad boy recovered in black leather with a red stripe at the top. This gives me an excuse to get a quick release hub.
Preliminary roll bar installation SUCKS!! It’s going to come back out to be welded and painted.
Installed my new retro fit headlights and HID kit from @B.mad over at Madd Retros!! More information on these can be found here:
Took some time today to “finalize” the engine compartment side of the battery relocation and to also install the O2 sensor.

The ground cable from the trunk terminates at the passenger side engine mount.

I followed the brake line and took care to keep it away from the exhaust.

This needs no explanation..

Didn’t have the proper size heat shrink so I will revisit that never.

Terminated the positive cable to the starter.

Overview at this point:

Mechanical grounding point!

One of the biggest mistakes people people can make when grounding electrical components is not properly preparing the area for a good connection. This is done by removing any paint at the termination point.

What are are you looking at?

Ta da…

Its ugly but have you seen the rest of the car!?

This was my preliminary route for the 02 sensor wiring…

…but I ran out of tywraps! Another time..

Moving to another task…

Thankfully I was able to reinstall the HVAC duct because God knows we can’t live without AC in Louisiana
Such a cluster fuck!
The last time I posted was back in September of 2018. Since that time, there have been several key changes to Project Unicorn’s direction. If you may recall (if not, you can just read back a post or two to catch up) we were counting down the days to a first start. While function checking the electrical system, I discovered my SCT tuner couldn’t rear the ECU via the OBD2 port.
Vat ez fook?
As it turned out, there are differences between the Mustang GT and Cobra wiring harnesses. You cannot simply plug a Cobra engine/ECU harness into a GT dash harness and also use the Cobra ECU. Not without re-pinning the harness and running new wires where necessary. This could’ve been remedied by using a GT engine/ECU harness and ECU by lengthening wires for certain sensors.
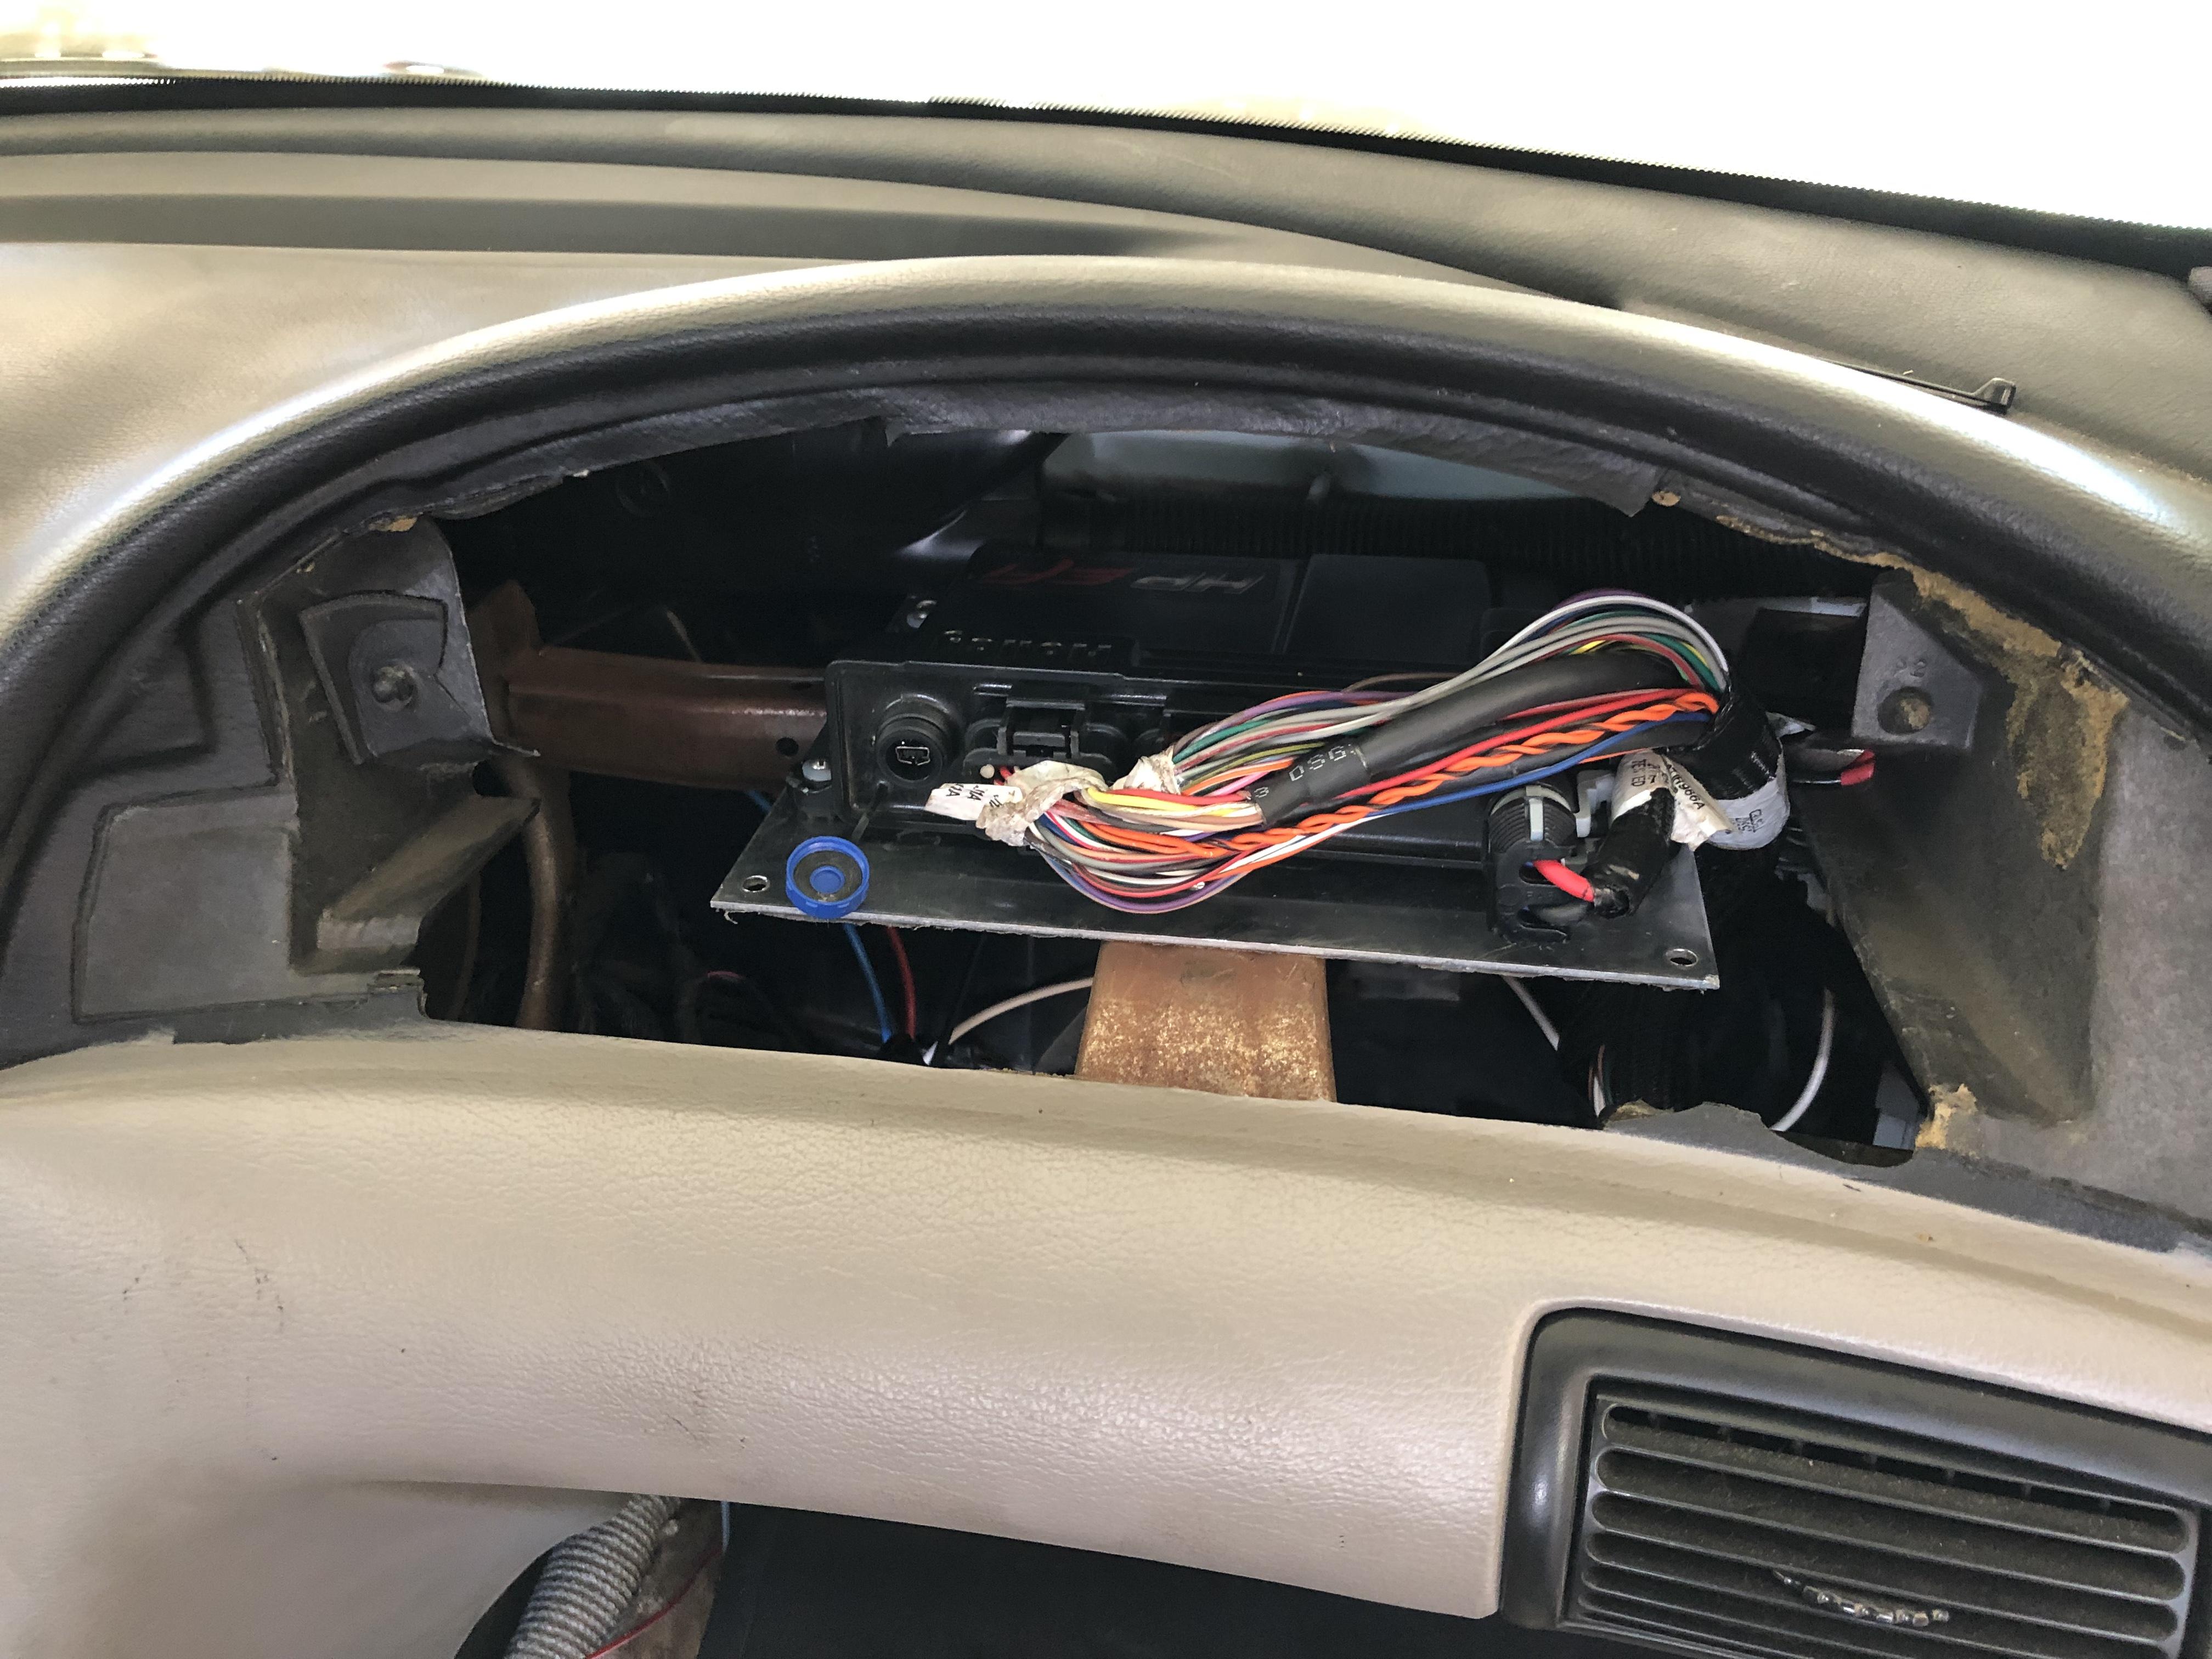
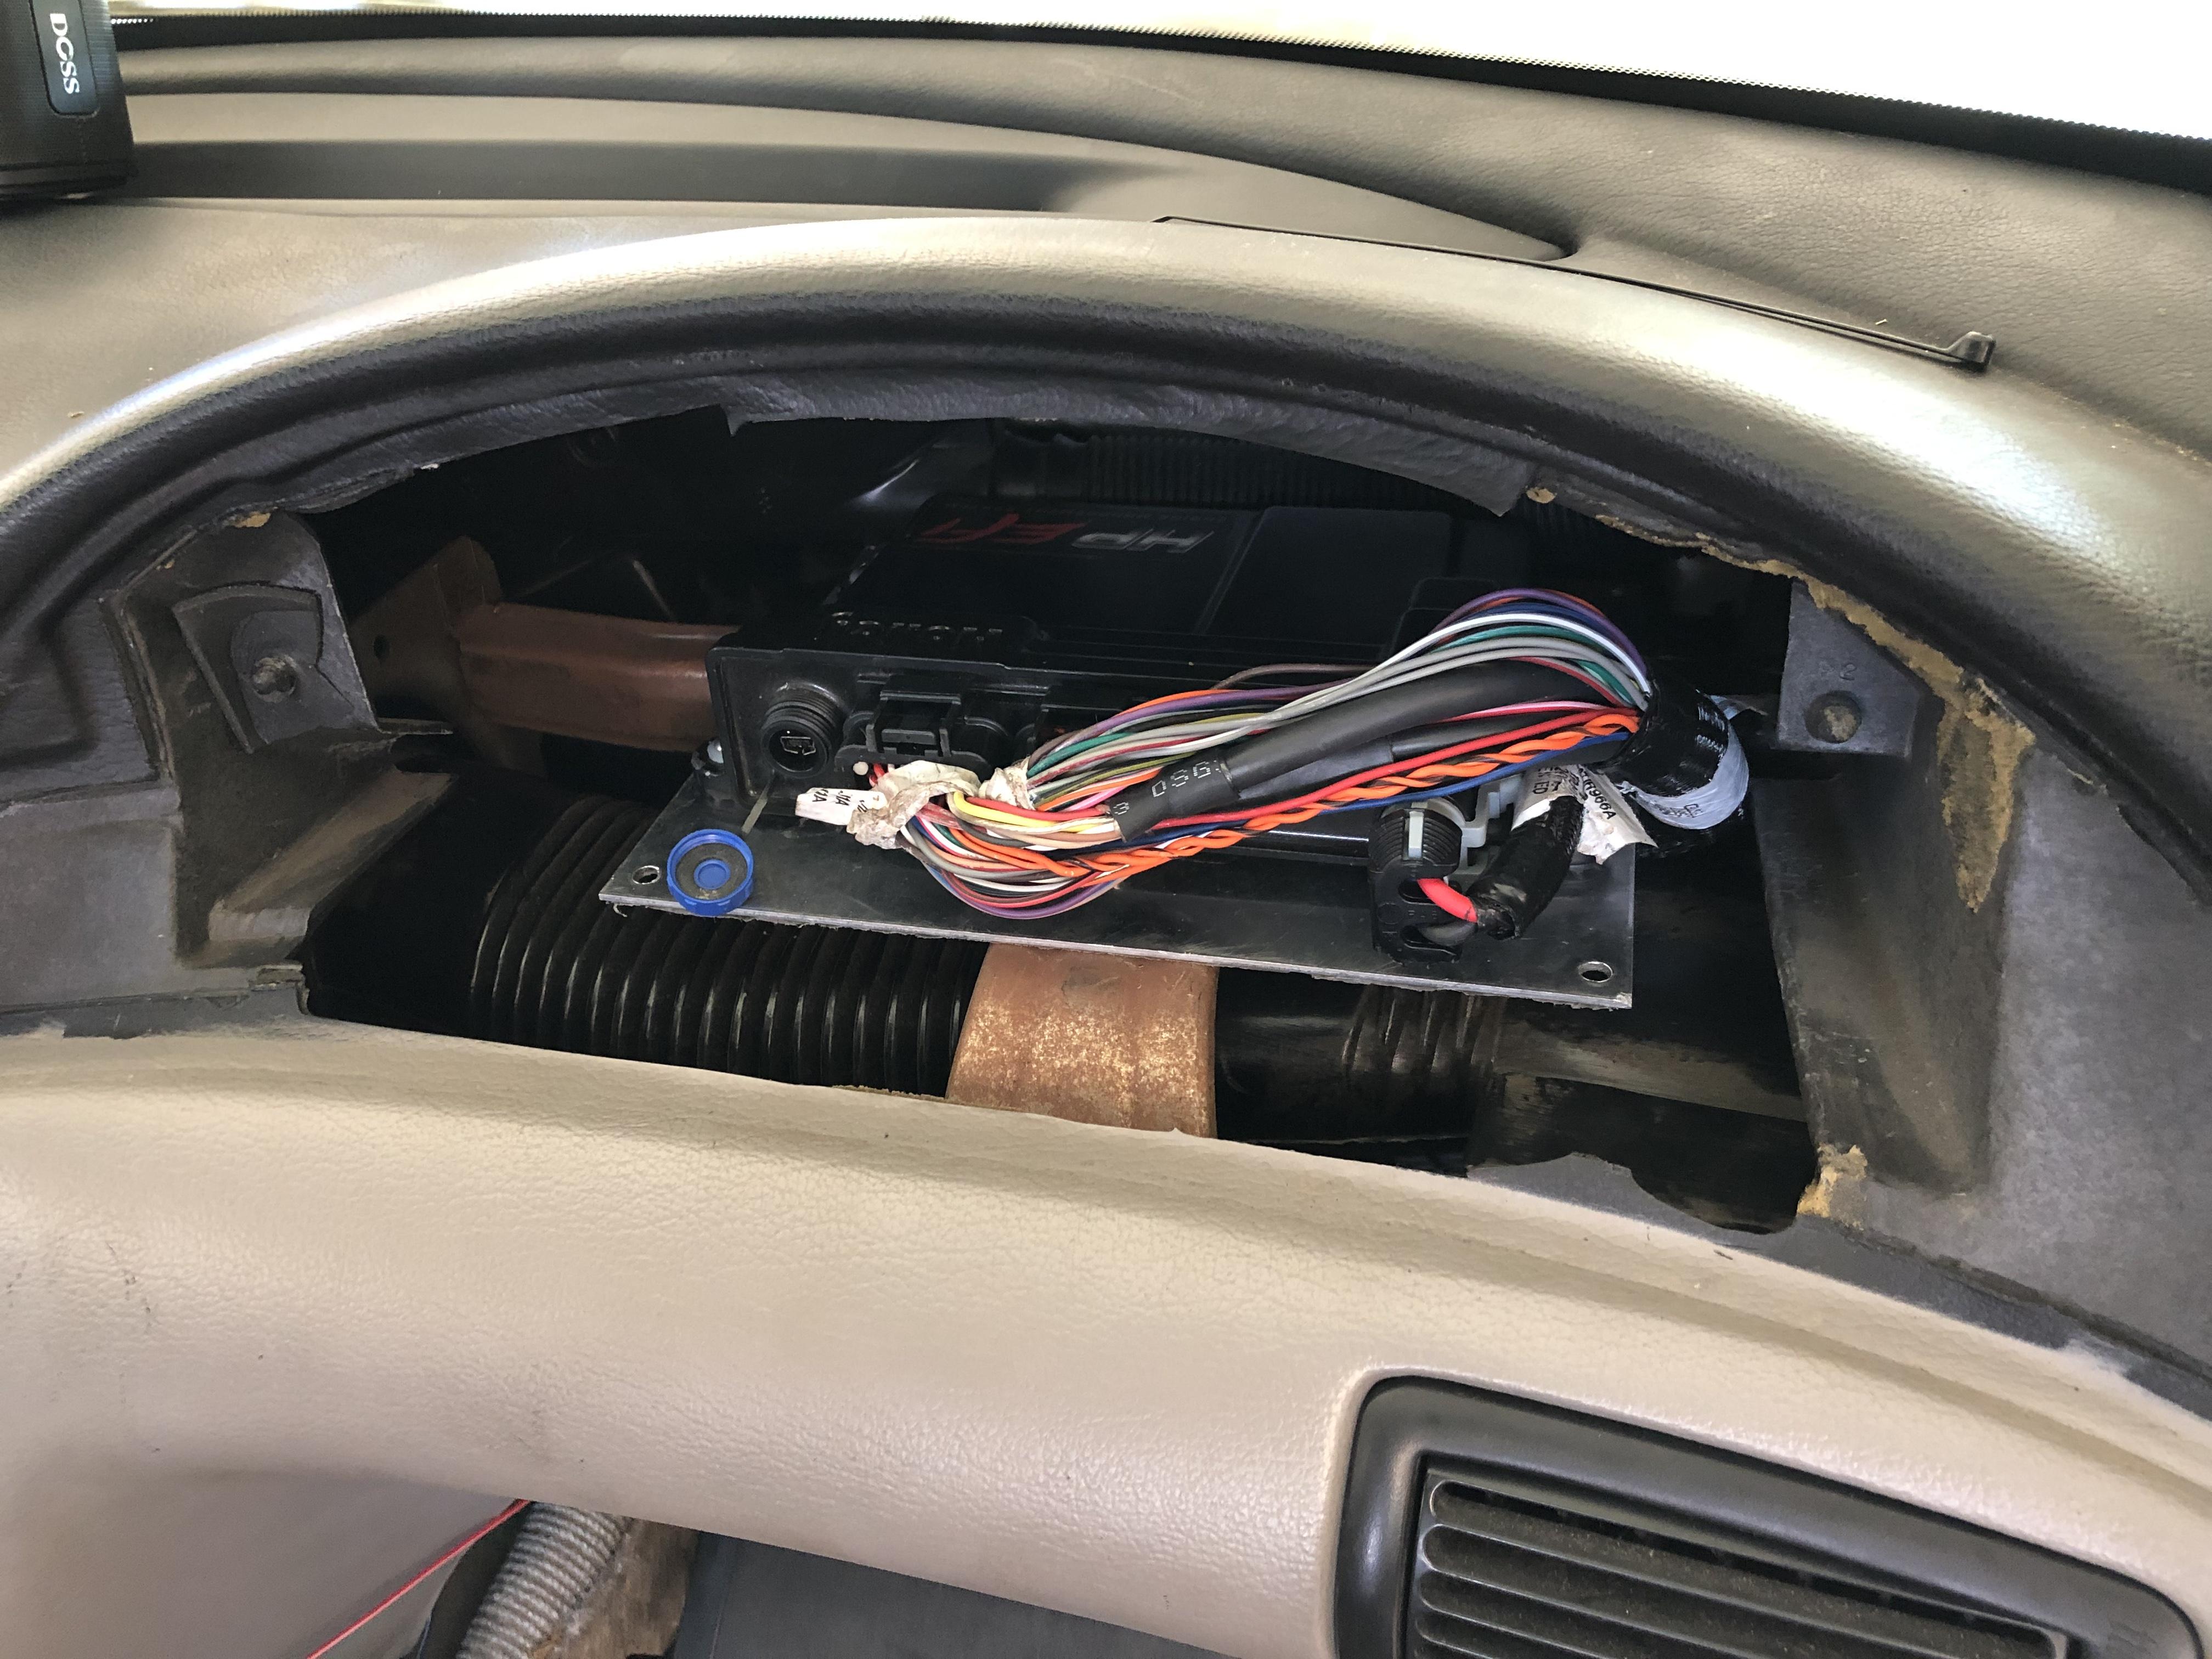
Well, shit. If I had to go through that much trouble I might as well take it up a notch. I made the decision to rip the Ford engine management out and upgrade to a Holley HP EFI (HEFI) setup to facilitate future growth.


There is still much work left to do:
That’s just a surface scratcher!! To further update this, I need to mention that I sold my Jongbloed Racing Wheels. They were just too awesome and I didn’t want to cut my car up to facilitate their überness. So, I traded them for a stack of cash and a pair of 18×11 Enkei RS05RR wheels. The plan is to buy a pair of 18×10’s and use them for track day/autocross action. I also bought a set of Forgestar F14’s in 18×9/18×10 for street wheels.


This is current day, awaiting a trip to the have the welding work done:

Found an older JLT cold air intake on eBay for cheap. Things are starting to really take shape now!

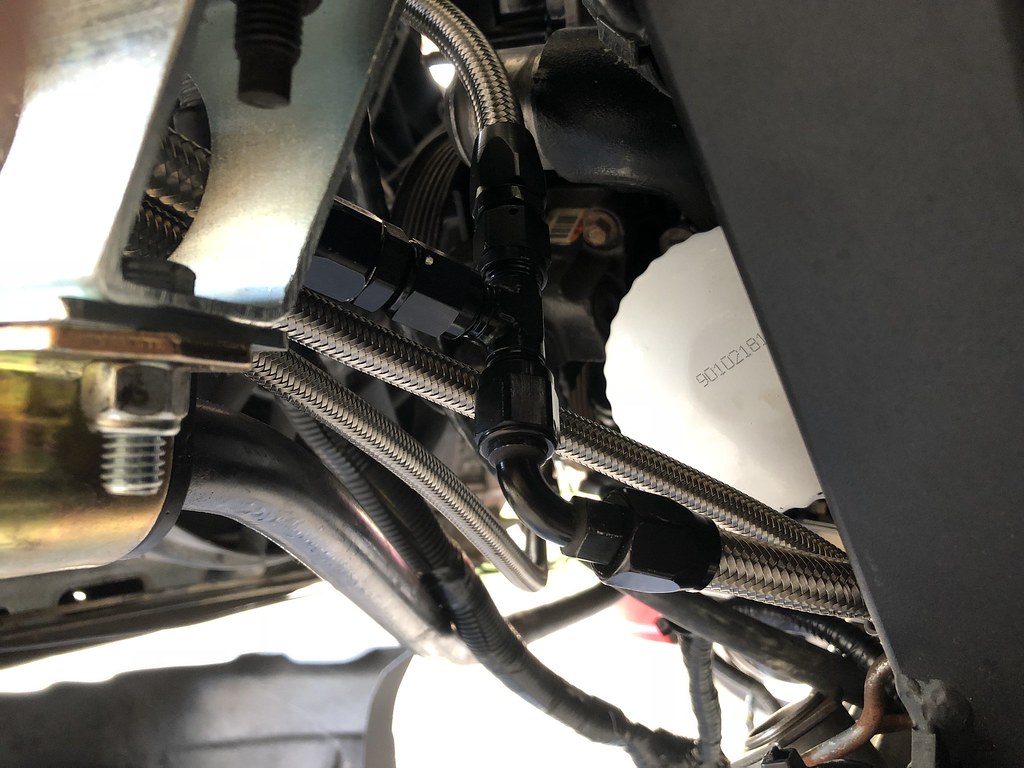
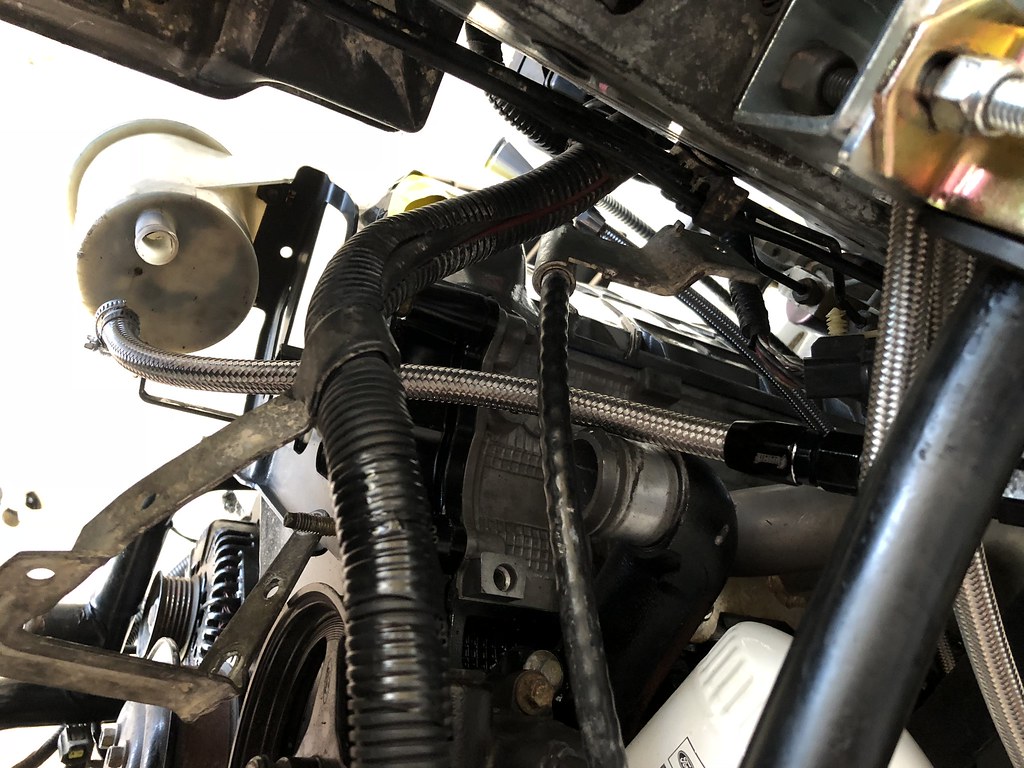
We “finished” the AN power steering hose swap!!
The finalized routing just needs to be permanently mounted:
The tee fitting for the low pressure side:
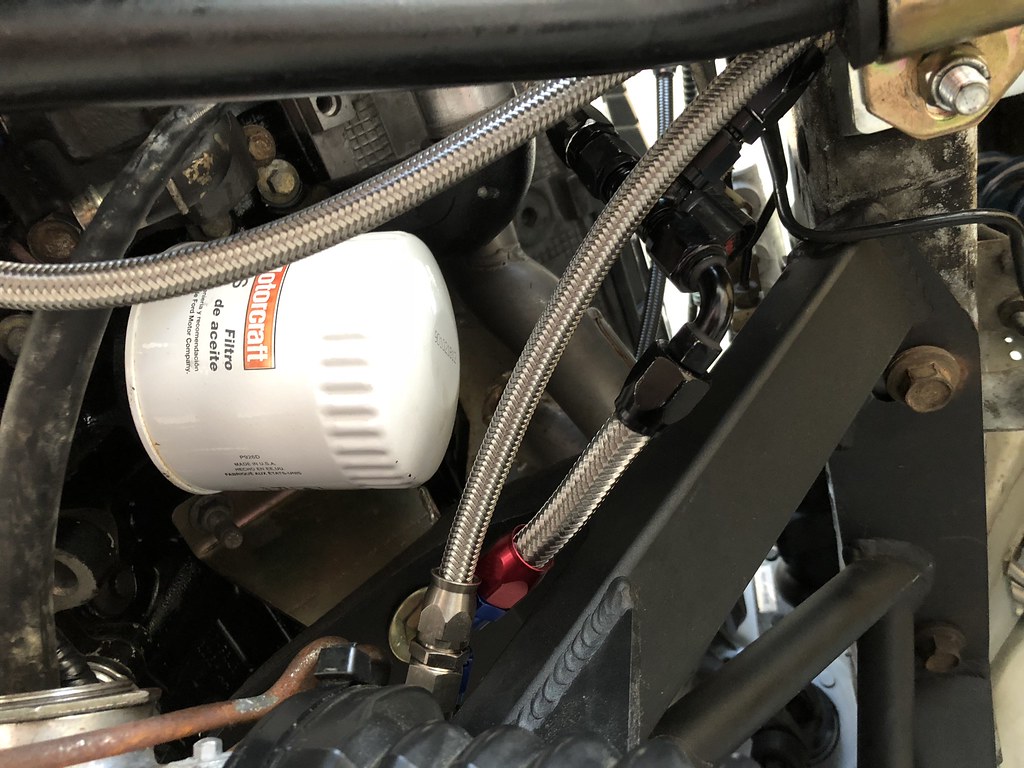
Reservoir to tee:
The rack connection:
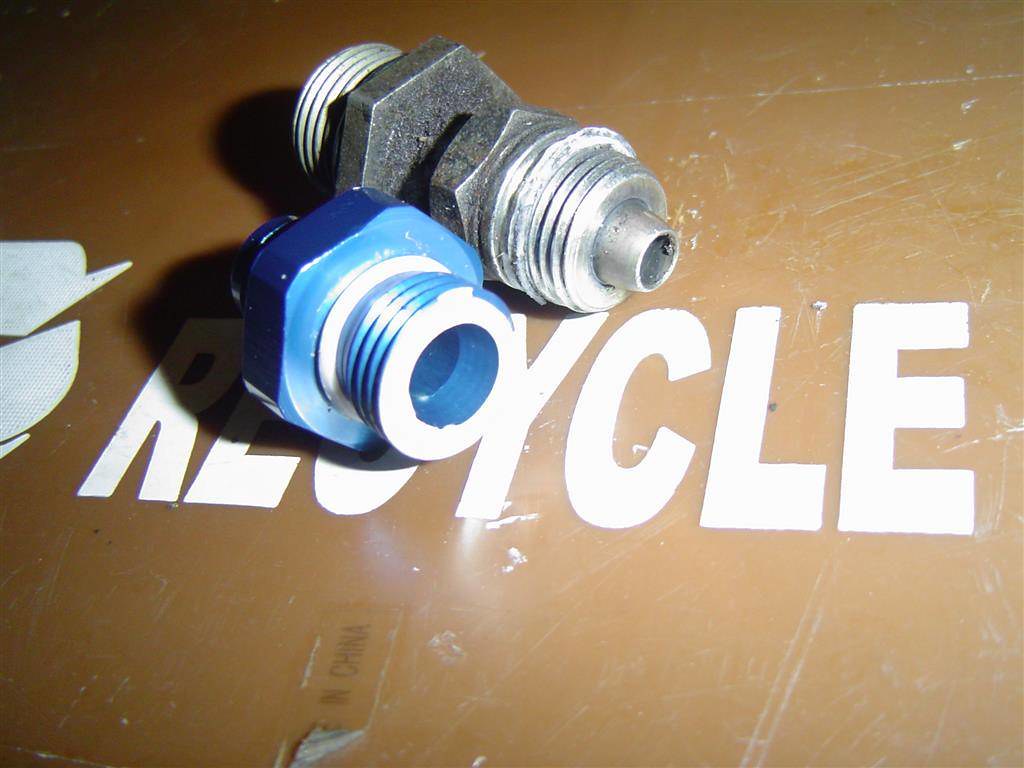
It was brought to my attention that the power steering fitting blocks a fluid passage. I took the stock fitting out of an old pump to see what he meant and found this:
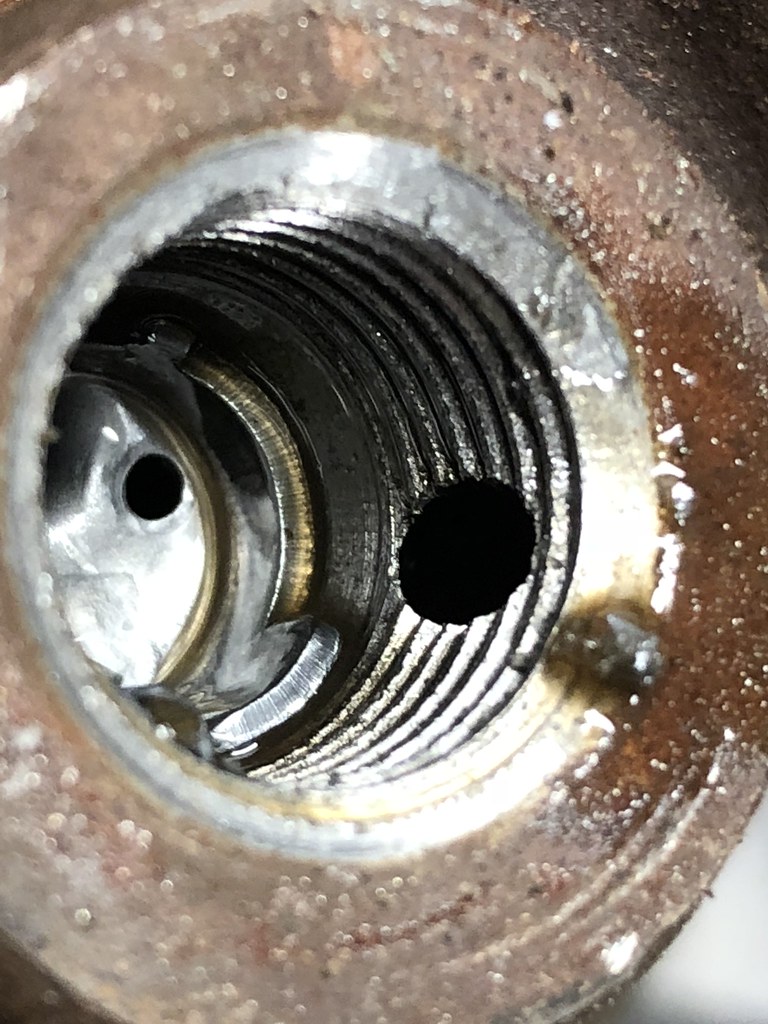
Did some research and found a thread over on the TCCOA (Turbo Coupe Club of America) forum where someone found an easy fix by cutting the Russell fitting down:

More on this at a later date!!


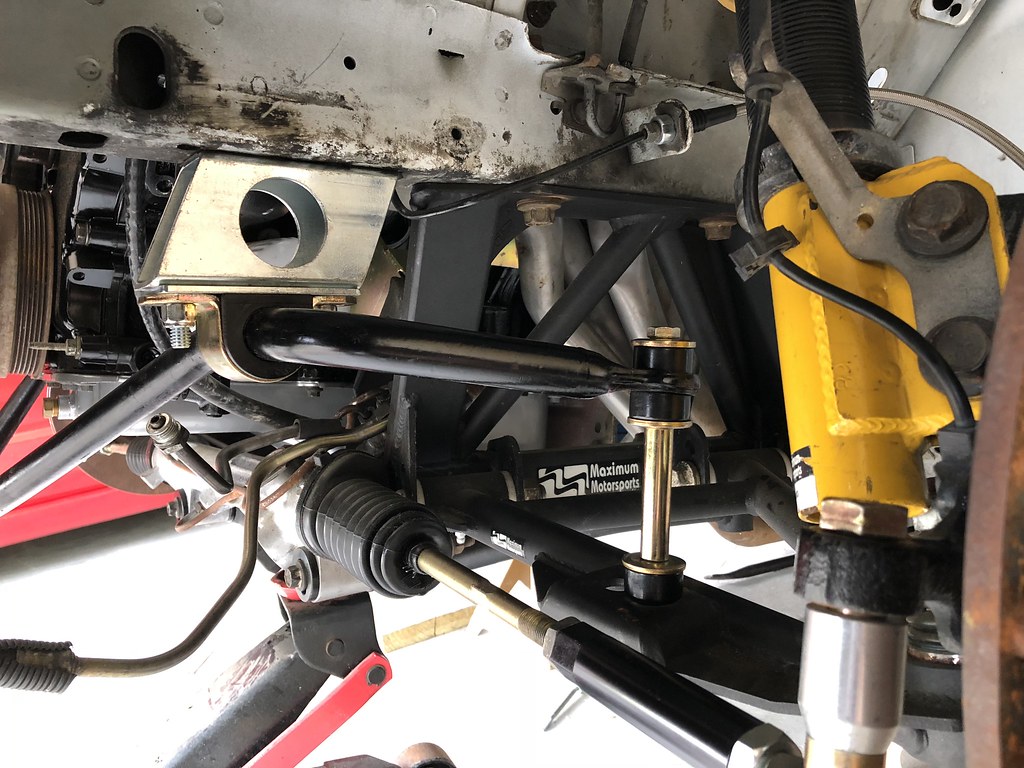
Not very significant achievements but I install the sway bar relocation + shorter end-links and started the AN power steering hose swap. More importantly, I squared the k-member and can now begin the end…..to reach the beginning. ?
Finally found the correct throttle return spring:
New look!
The
There will be some modifications to the trailing edge of the bumper to fit the front suspension.

My list, in no particular order, to just hear it run:
1] Square the K-member then nut and bolt check the front suspension & perform ‘mechanics alignment’
2] Bolt the tail shaft down
3] Install the engine power harness, connect the 02’s and install transmission harness
4] Rewire the fuel pump relay
5] Tighten the header bolts and the one oil pan bolt we apparently missed
6] Tighten fuel line fittings
7] Swap the Cobra ECU for the GT ECU, upload the start tune; mostly to keep PATS happy
8] Fill the engine with oil, fuel in the tank and engine coolant; leak test fuel system…
9] Mount CAI and MAS
Fire in the hole?? I should be able to at least hear it run for a moment, listen for weird noises and check for oil leaks. On top of that, I also need to acquire some bolts to mount the AC compressor and power steering pump as well as the accumulator plus both AC hoses. I’m not going to attempt to drive the car or even get it up to operating temperature until I can drive it legally. I need to go beat on it right away to set the rings since they’re stainless steel. Lol, this will happen with some mufflers nearly bolted directly to the headers because my foxbody 5.0 x-pipe needs to be modified to fit the SN95 4.6 Probably need to acquire some corner lights while I’m at it..
Now, hearing the damn thing run is all fine and dandy but there is MUCH more to do. My list, in no particular order, to drive the car:
1] Mount AC compressor, PS pump and PS reservoir
2] Complete PS lines, fill the system and…..bleed?
3] Install rear brake pads, fill and bleed the system
4] Install the driveshaft
5] Install the front sway bar + MM relocation kit
6] Connect the steering shaft
7] Car insurance?
8] Hope for the best?
Rough draft of my modified coolant system.. The secondary [bypass] outlet in the coolant crossover has been welded shut and the thermostat is now inline with the upper hose. This will allow me to use my traditional radiator setup with an overflow tank instead of the typical, closed system with the hideous degas tank that most every modular car has.


I’m going to cut the coil pack mount off of the engine accessory bracket to make it at least sort of look better.

These new power steering hoses fit like SHIT and look like ASS!! As mentioned in an earlier post I’m going to convert to the AN fitting setup.
Gave the parts hauler some love by installing a Belltech lowering kit. Afterwards, had an alignment performed. It rides quite well, all things considered.


…and firewall panel! Wiper cowl coming soon…


Now that I have the PS, AC and starter mounted, I can finalize the wiring.
Just need some o2 harness extenders and a few more bits.